The rubber on wheels are sick. They look sticky and meety.
| 4g61t.org http://4g61t.org/forum/ |
|
| CrunchyMilk's "Fun Size Evo" Build http://4g61t.org/forum/viewtopic.php?f=64&t=34531 |
Page 4 of 7 |
| Author: | 4G15COLT [ Fri Jun 10, 2011 5:27 pm ] |
| Post subject: | Re: CrunchyMilk's "Fun Size Evo" Build |
The rubber on wheels are sick. They look sticky and meety. |
|
| Author: | CrunchyMilk [ Mon Aug 29, 2011 10:12 pm ] |
| Post subject: | Re: CrunchyMilk's "Fun Size Evo" Build |
I finally got moved in to the new place and settled to the point where I felt the need to start tearing into the project (plus people are waiting on parts that I promised would be coming off of it! First up on the list was to weigh the heap and then dive in to the first stages of weight reduction. You're probably wondering where I am going to cut weight out of an already empty shell right? Well let's start with the corner weights, total weight, and cross weights. Up on the scales 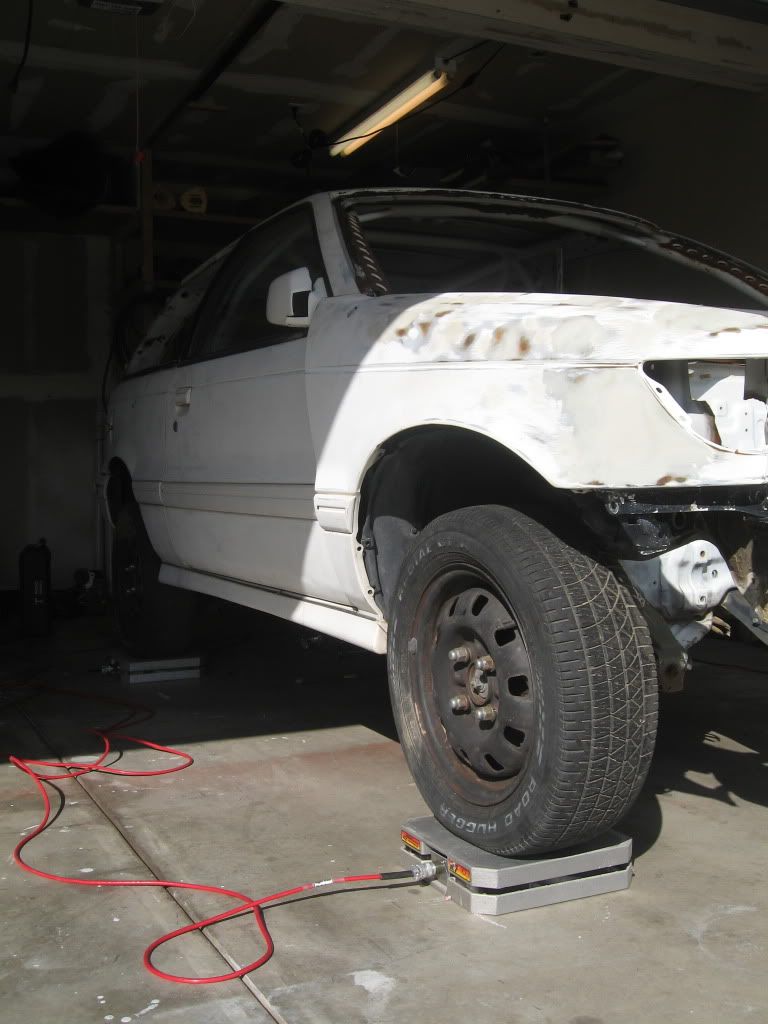 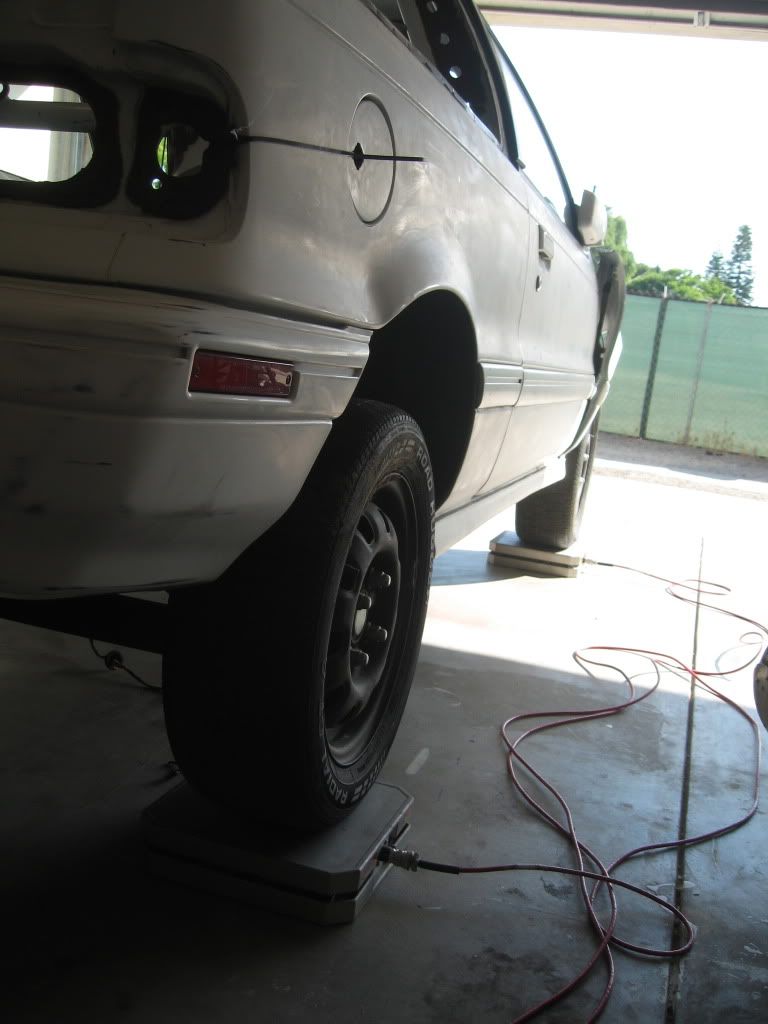 Initial readings, 1256-57 lbs 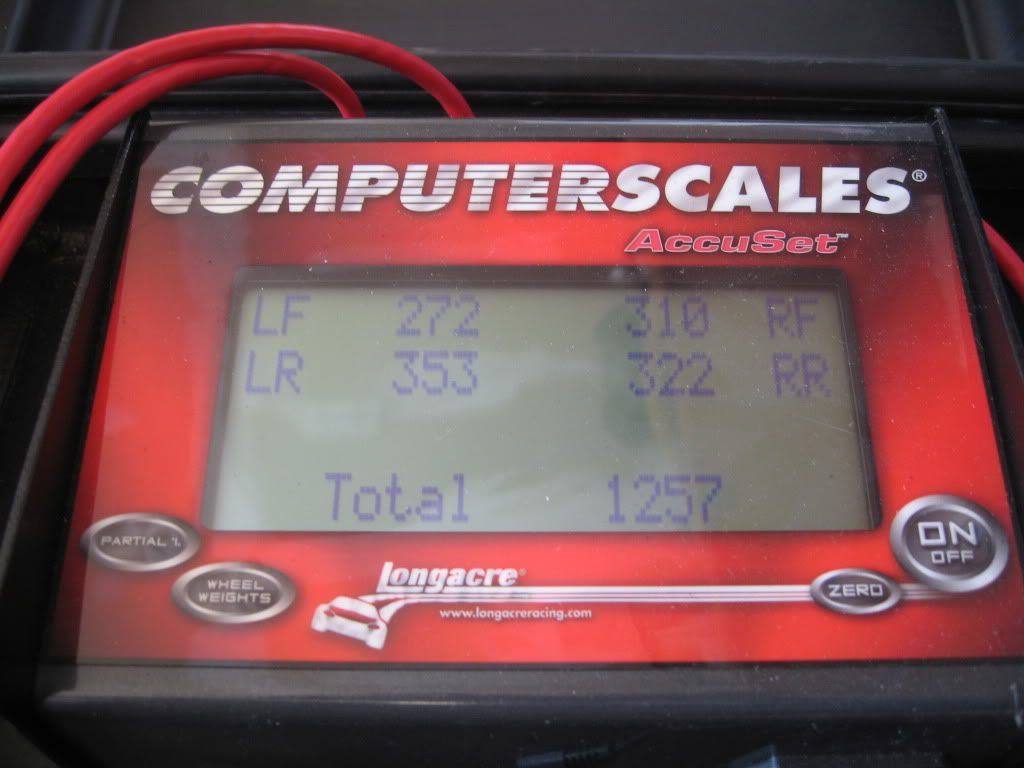 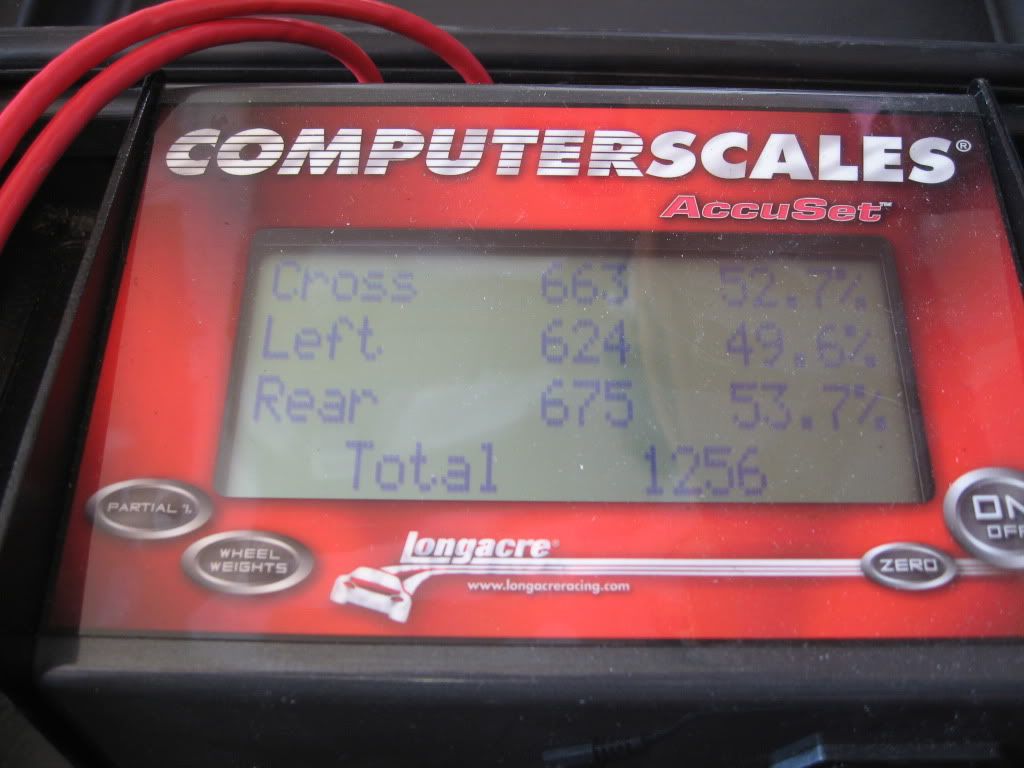 After weight reduction there was a huge shift of corner weights because of how it settled 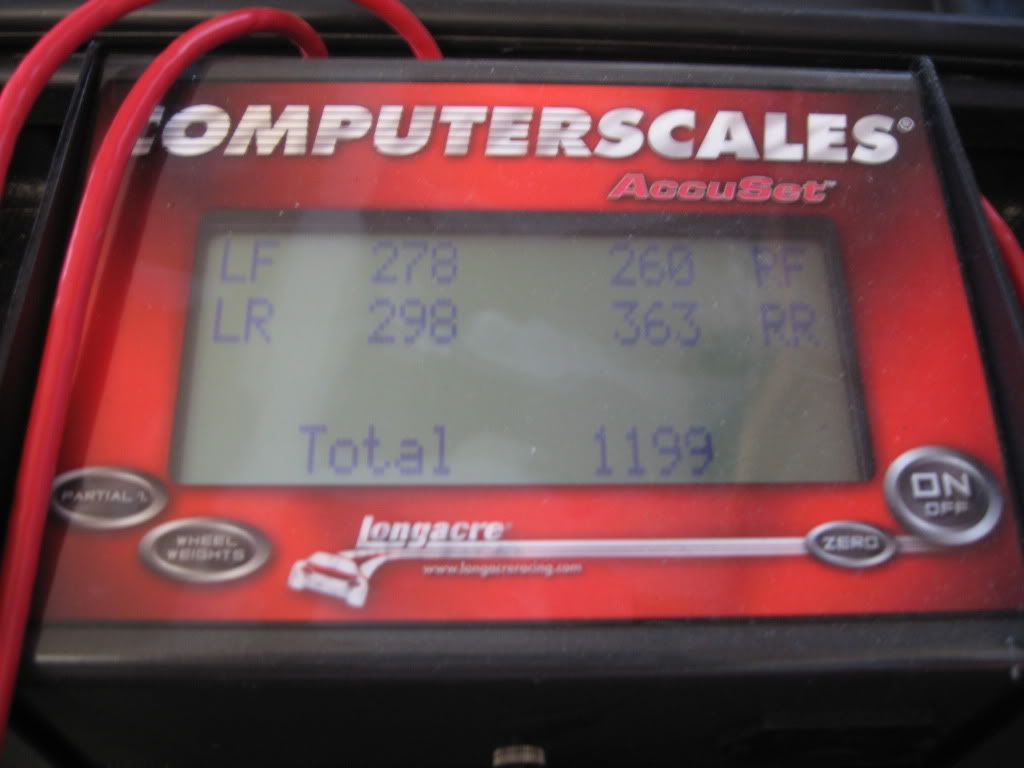 So what did I remove 57-58 lbs of?.... THIS 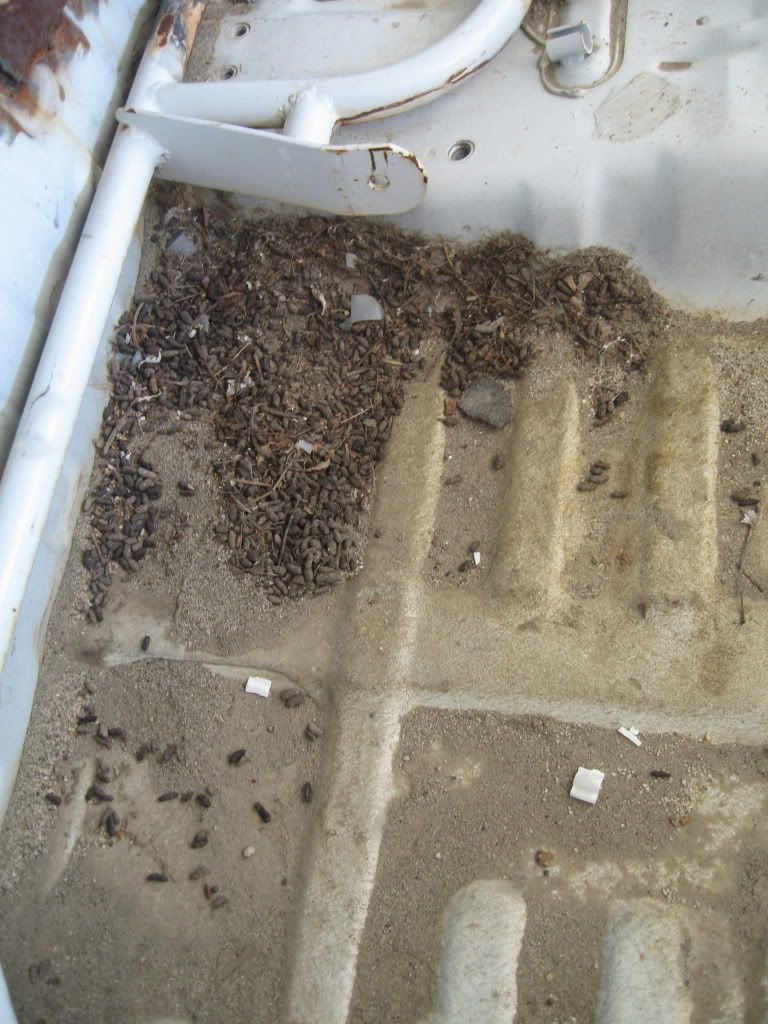 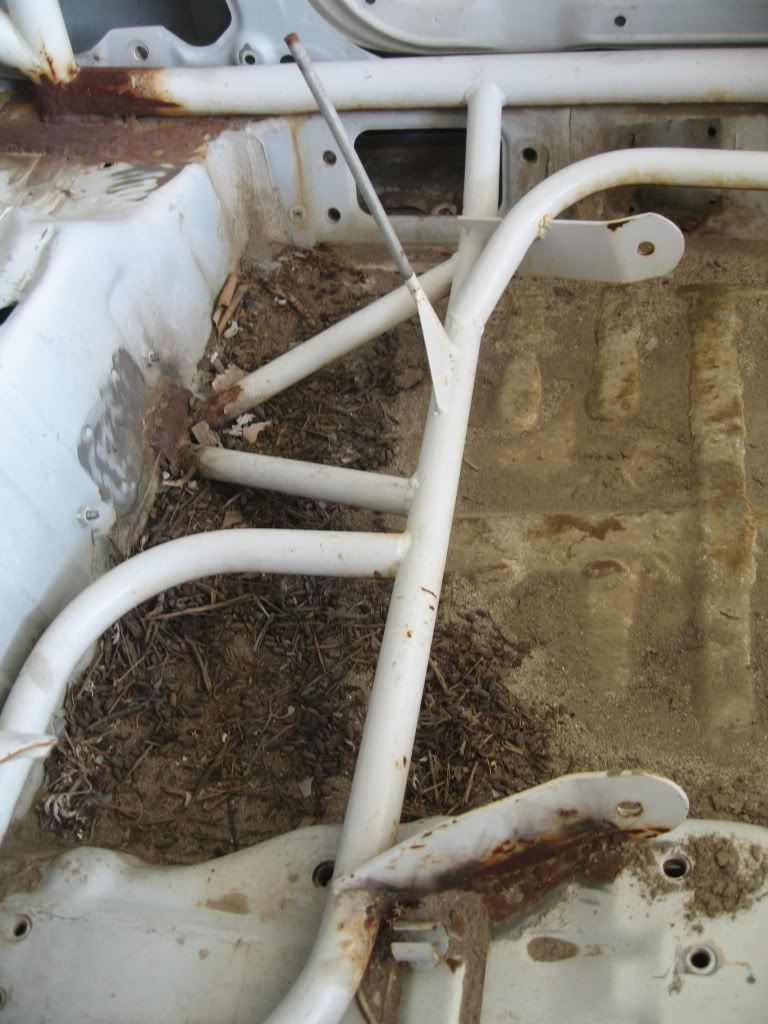 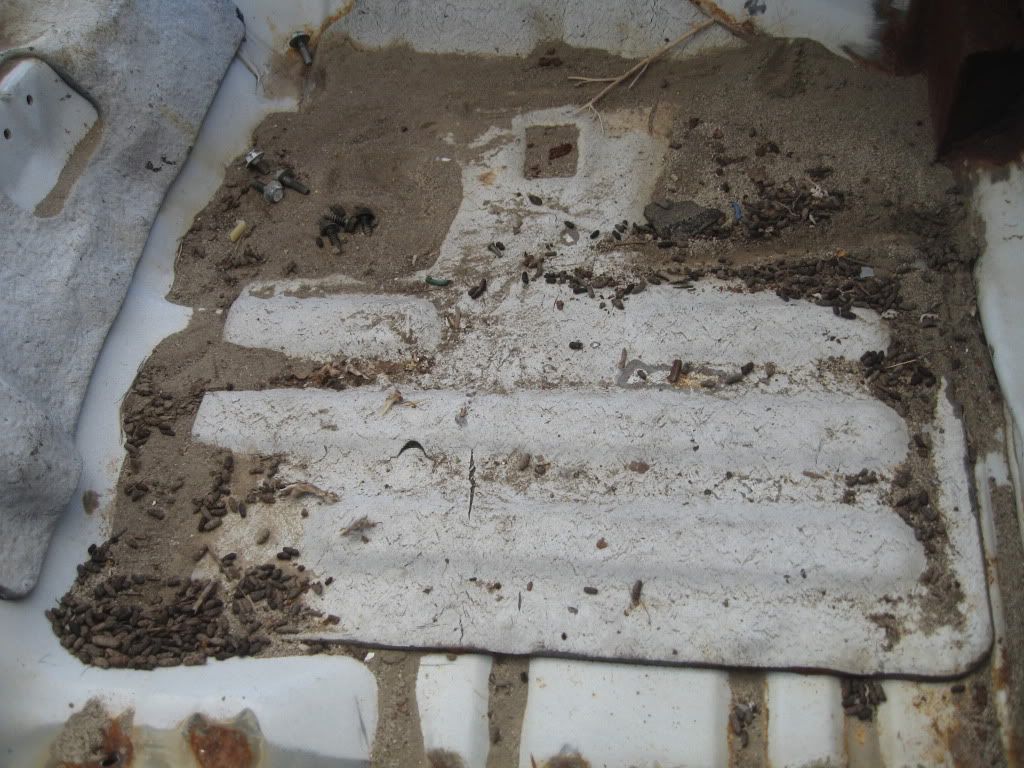 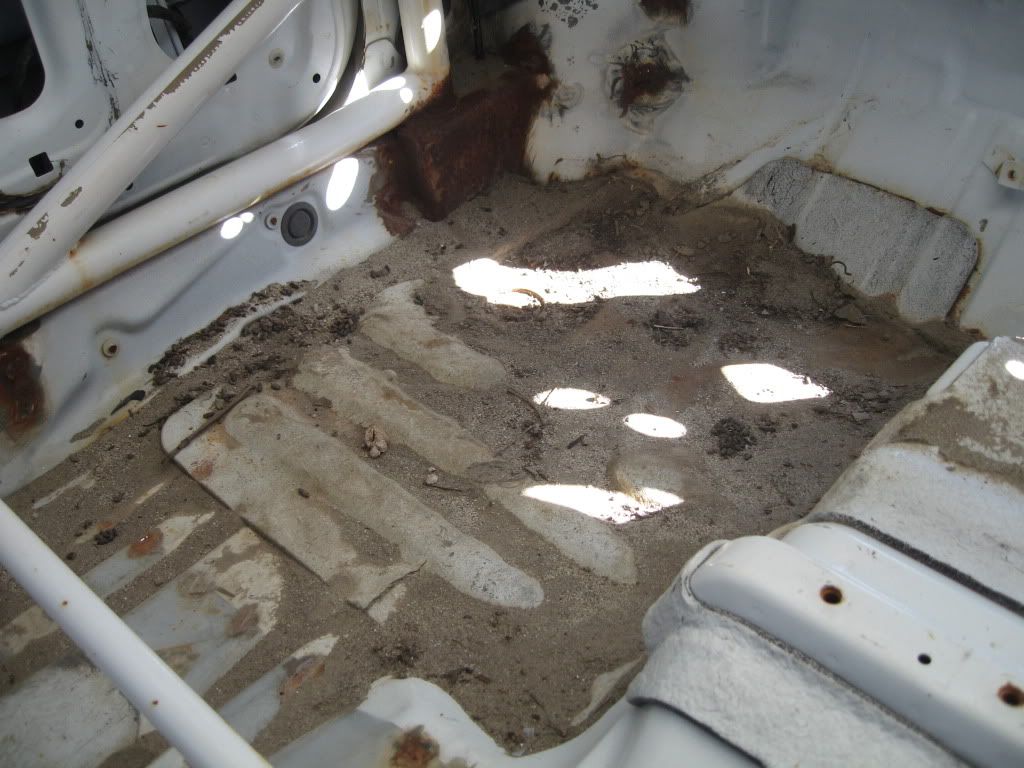 That's right! Rat turds and sand! |
|
| Author: | CrunchyMilk [ Mon Aug 29, 2011 10:17 pm ] |
| Post subject: | Re: CrunchyMilk's "Fun Size Evo" Build |
Time to go up on the stands 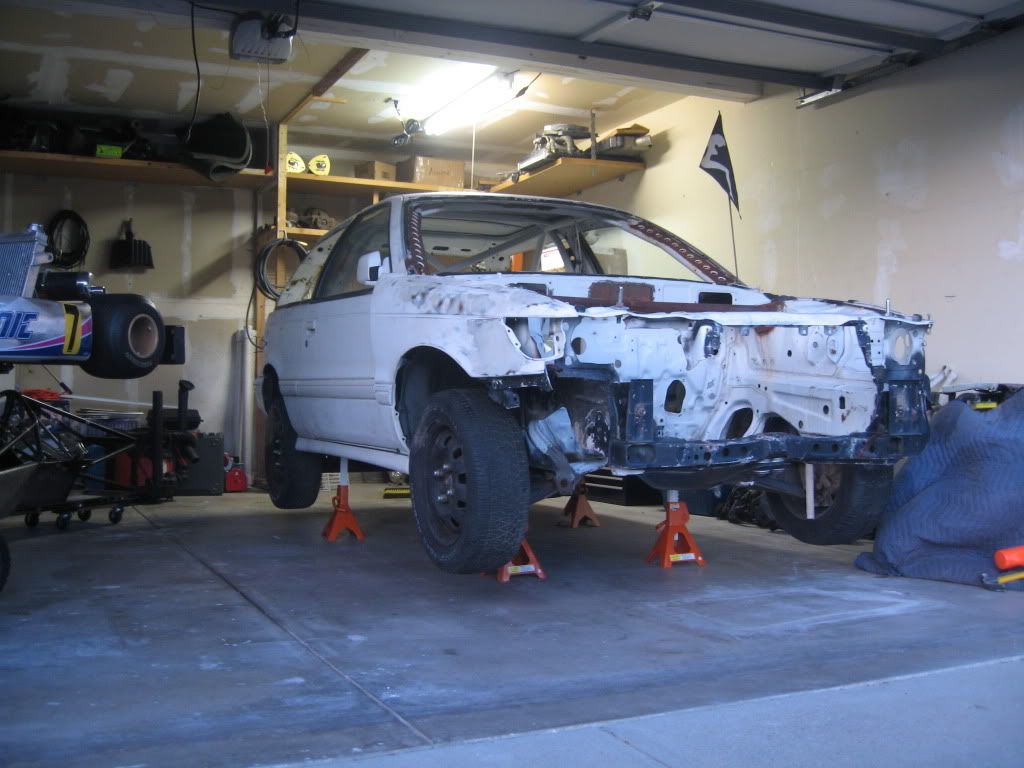 And here is how she sits now; with some other toys 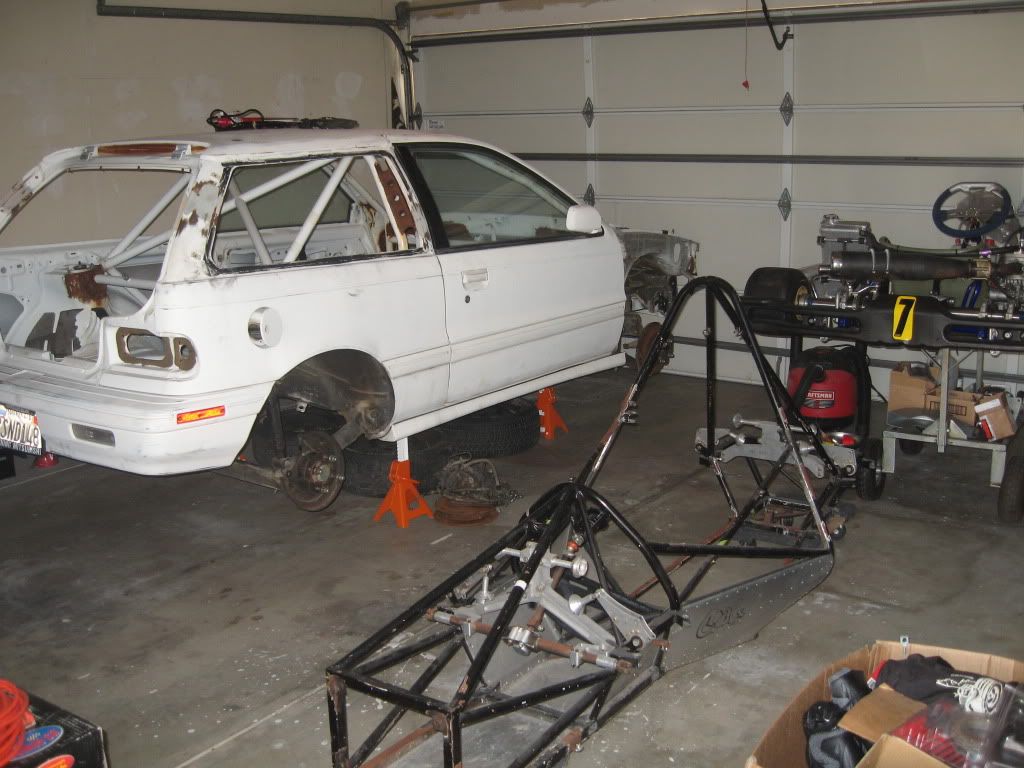
|
|
| Author: | CrunchyMilk [ Tue Sep 06, 2011 3:08 am ] |
| Post subject: | Re: CrunchyMilk's "Fun Size Evo" Build |
Well there is a first time for everything right? How about Evo IX LCA's on a Colt Stock Colt and Evo Side by Side 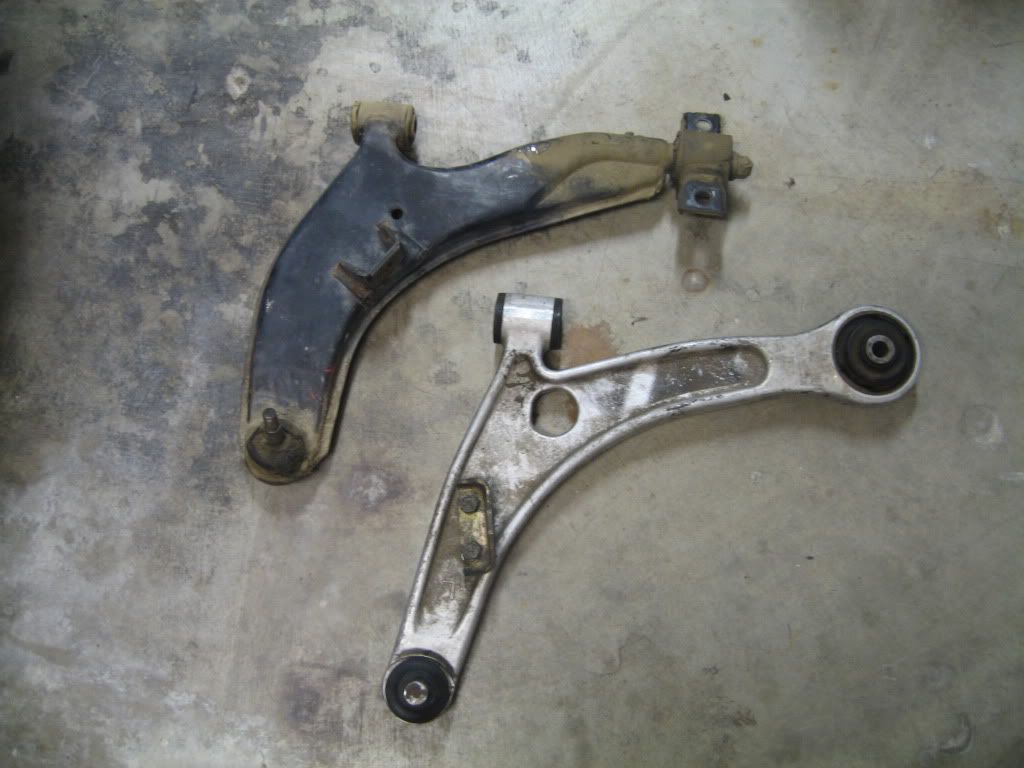 The Evo LCA is just a tad wider and uses a balljoint with a non-tapered stud that the upright clamps onto. In addition to saving a few pounds on each corner this setup gives me the proper track for the Evo halfshafts and allows the Evo upright to be a bolt on affair. 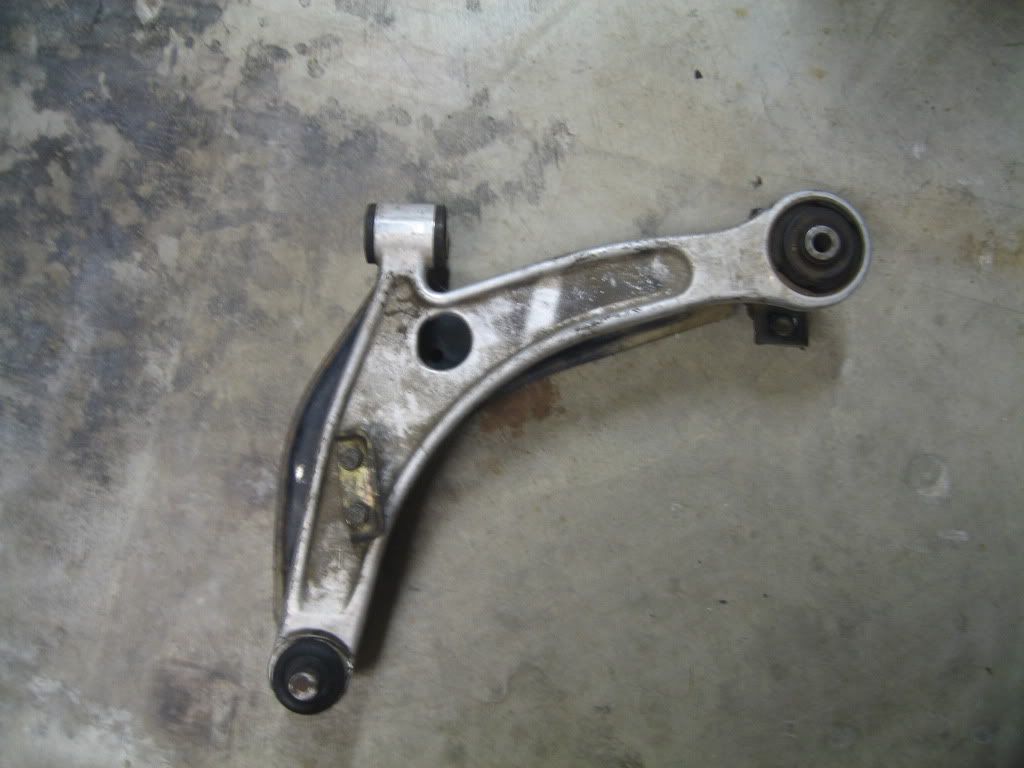 Right Side 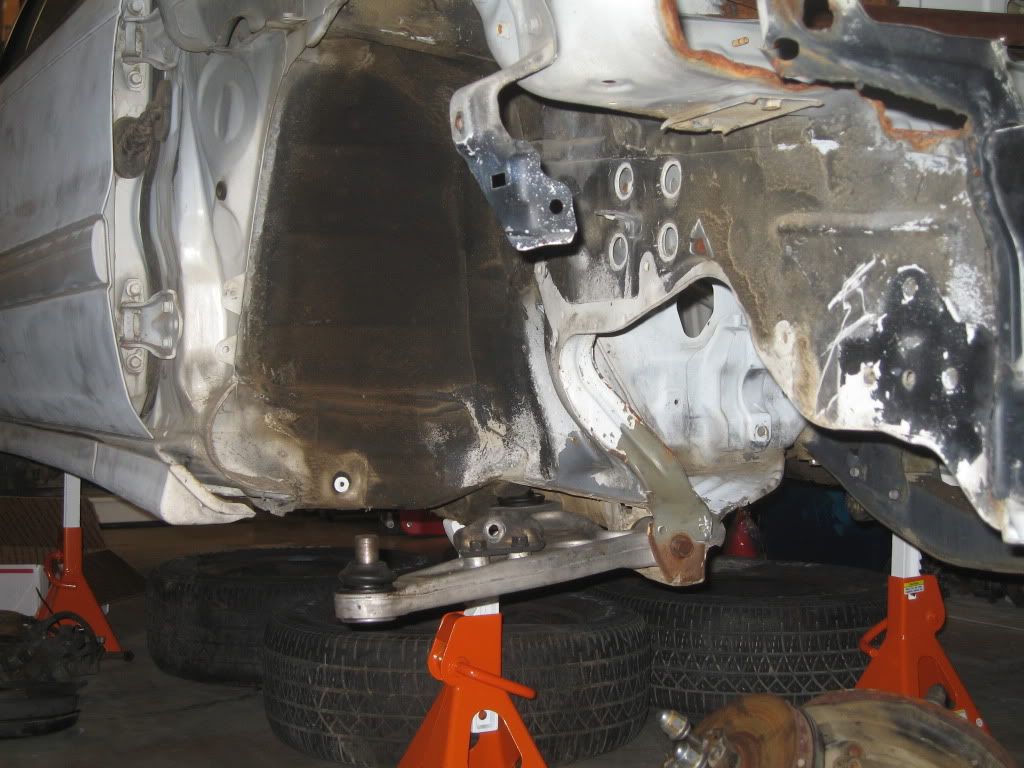 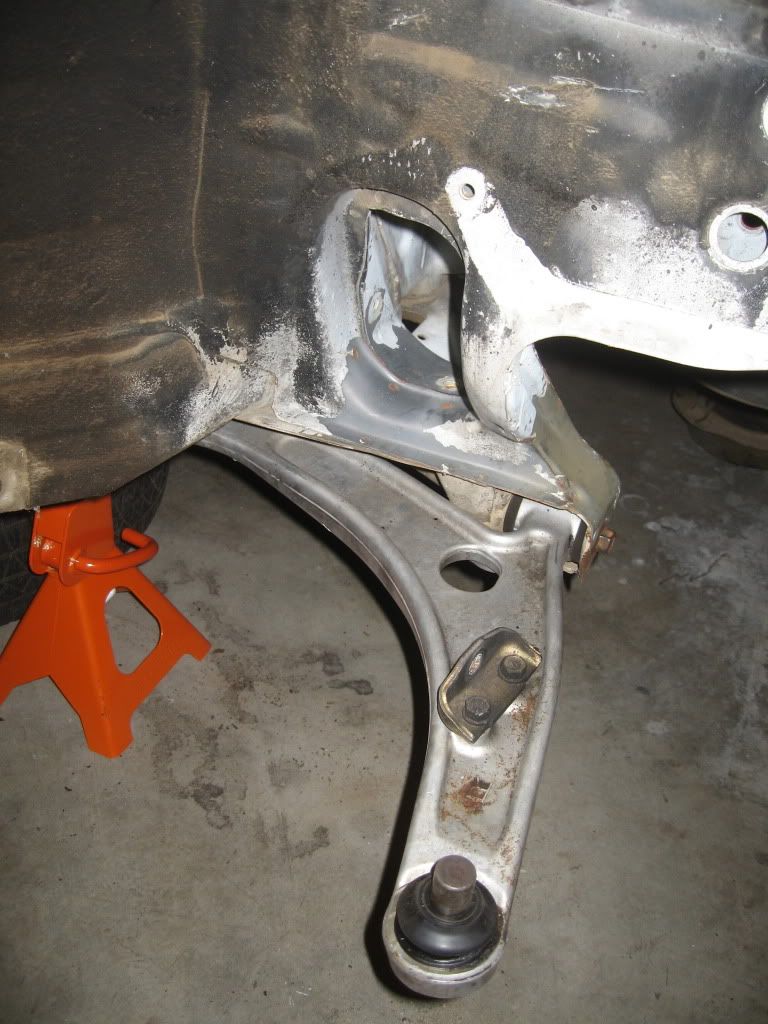 I'll be fabricating a new bracket to secure the rear spherical bushing mount. 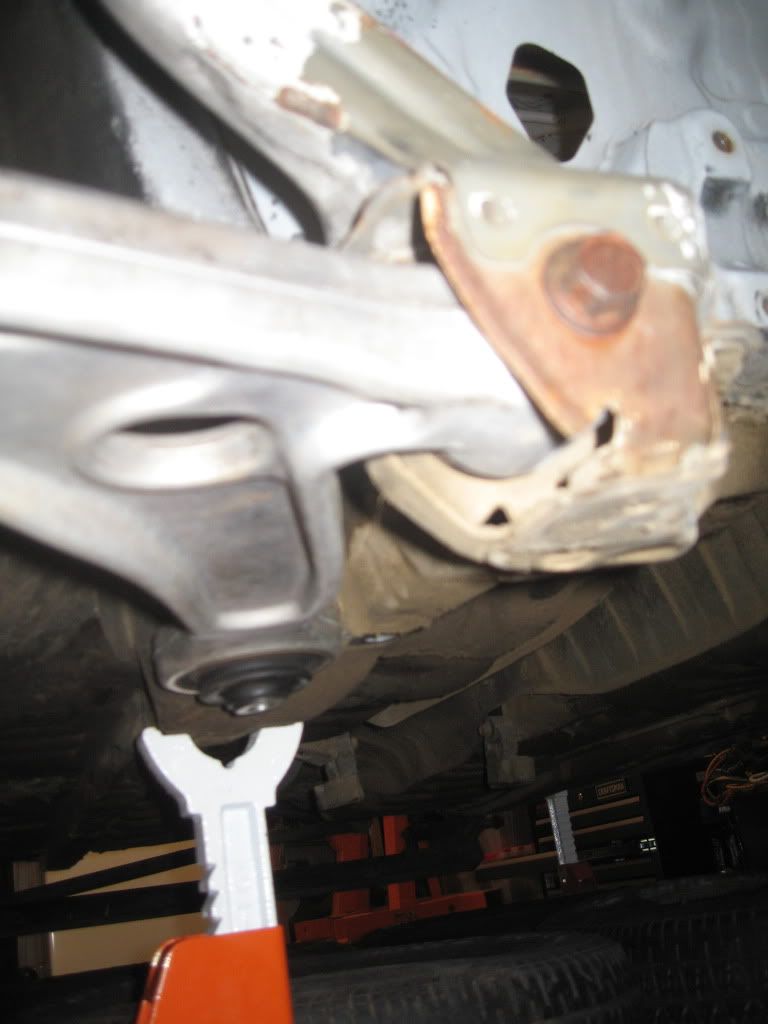 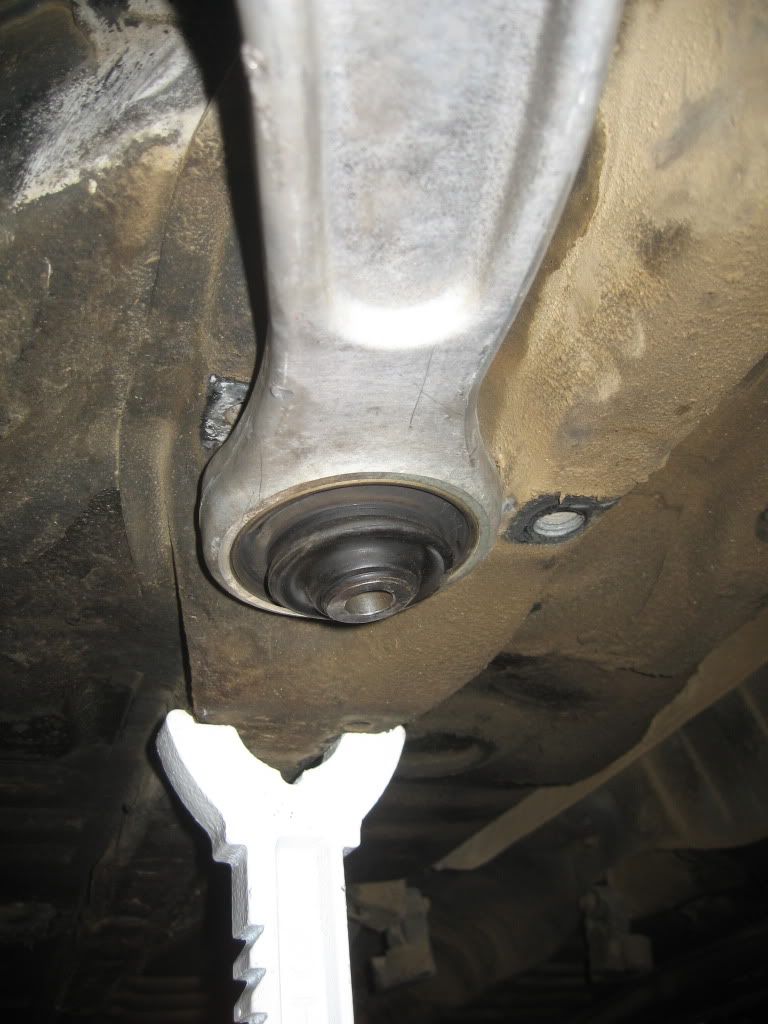 That's all for now... next will be the rear LCA mounts and modding the strut tower for my JIC's. |
|
| Author: | 89Mirageman [ Tue Sep 06, 2011 9:25 am ] |
| Post subject: | Re: CrunchyMilk's "Fun Size Evo" Build |
Great progress so far! |
|
| Author: | MattGSR [ Tue Sep 06, 2011 4:13 pm ] |
| Post subject: | Re: CrunchyMilk's "Fun Size Evo" Build |
You should weigh the evo LCA to compare, good stuff. Keep it up! |
|
| Author: | Evotistical [ Thu Sep 08, 2011 4:08 pm ] |
| Post subject: | Re: CrunchyMilk's "Fun Size Evo" Build |
All of this mega juiciness makes me wonder if you can stick a evox aluminum motor in?? Keep it up sir! |
|
| Author: | CrunchyMilk [ Fri Sep 09, 2011 12:29 am ] |
| Post subject: | Re: CrunchyMilk's "Fun Size Evo" Build |
Quote: All of this mega juiciness makes me wonder if you can stick a evox aluminum motor in?? Keep it up sir!
You can put anything into anything with enough time and money I think the 4B11 is a waste of time though |
|
| Author: | CrunchyMilk [ Mon Oct 03, 2011 10:45 pm ] |
| Post subject: | Re: CrunchyMilk's "Fun Size Evo" Build |
No pictures this time but I have made some progress. In an effort to keep the swap looking as OEM as possible (and saving myself from having to fab motor mounts with all the time I don't have) I bought a set of OEM Evo mounts from a guy that was parting out his wrecked car. I just had him take a sawzall to the frame rails around the mounts and mail them to me. The engine will look like it came this way from the factory when it's all done. I removed the stock colt timing side mount off of the chassis by drilling out the spot welds and grinding down the remnants. The finish isn't perfect but I haven't even begun to tackle bodywork yet so I just hit it with some trim black that I had laying around to prevent rust. I also got the transmission side Evo mount spot welds drilled out so at least one mount is ready to go into the Colt. My spot weld cutter broke after only 4 welds on the Evo timing side mount so I have 13 more to go after I get a new spot weld cutter. I am reusing the lower subframe from rallyguy but will be modifying the front and rear engine/transmission mounts to bolt directly to the block/trans instead of using stock rubber bushing mounts. I also have to modify the backside of the subframe to accommodate the transfer case. Since rallyguy was only FWD there is additional bracing that is in the way that I will have to work around. This will make since when I get some more pictures up. |
|
| Author: | Evotistical [ Mon Oct 03, 2011 11:10 pm ] |
| Post subject: | Re: CrunchyMilk's "Fun Size Evo" Build |
Please sand, and paint those welds(at least temporarily). Semi-Geek explanation below: Since welds join 3 different types of metal(chemically, and conductivity speaking), they rust exponentially faster. By you heating the metal it changes its properties and ability to hold electrons. Any difference in electrons creates a charge which plates your metal away. The 3 different metals is the bar, the rod metal and the body of the car. This also applies to any other metals that touch each other. Which is usually why you see rust start on screw holes/screws. |
|
| Author: | CrunchyMilk [ Mon Oct 03, 2011 11:17 pm ] |
| Post subject: | Re: CrunchyMilk's "Fun Size Evo" Build |
Which welds? If you are referring to anything on the chassis/cage you can be sure that most of them will be gone over again anyway. Most of them are somewhat inconsistent and have craters or complete gaps in them. That's the reason that I haven't bothered, because I am going to be redoing them. Yep, I'm aware of the metallurgy behind welding as the metals heat and when/if they change phase depending on what type of welding is being performed. The welds on the cage nodes look good structurally (though they aren't the prettiest) but a lot of the attachment points on the chassis look like they didn't get good penetration and were done in a hurry. |
|
| Author: | Evotistical [ Mon Oct 03, 2011 11:20 pm ] |
| Post subject: | Re: CrunchyMilk's "Fun Size Evo" Build |
Yea if your going to refill the welds than its cool, I just see allot of cancer in the spots that make this car stand out from other 3g's. |
|
| Author: | CrunchyMilk [ Mon Oct 03, 2011 11:31 pm ] |
| Post subject: | Re: CrunchyMilk's "Fun Size Evo" Build |
This car isn't like a most of the others though. It has lived in/currently lives in one of the most dry, least humid areas in the country for its entire life. Bought in California, lived in California, will be restored in California. It is structurally as clean and sound as I can imagine yours was being from Arizona. We are a couple of the lucky few As long as the required bodywork does not interfere with any fab work needed for me to get the engine/suspension/rear end in I won't do it until after the fab work is complete. There is no point in stripping and maybe blasting the car until all of the new metal work is finished. |
|
| Author: | CrunchyMilk [ Thu Oct 06, 2011 12:31 am ] |
| Post subject: | Re: CrunchyMilk's "Fun Size Evo" Build |
Well the parts keep rolling in. Just got a package that contained all of the Evo rear suspension arms. Now I just need to put it all together. |
|
| Author: | 89Mirageman [ Thu Oct 06, 2011 7:35 am ] |
| Post subject: | Re: CrunchyMilk's "Fun Size Evo" Build |
You sound like me, I have parts laying around for mine everywhere and don't know where to start. |
|
| Page 4 of 7 | All times are UTC-05:00 |
| Powered by phpBB® Forum Software © phpBB Limited https://www.phpbb.com/ |
|