4g61t.org

Specializing in the 3g CSM
It is currently Mon Mar 18, 2024 9:53 pm

All times are UTC-05:00


Post new topic  Reply to topic  [ 87 posts ]  Go to page 1 2 3 4 5 6 Next
Author Message
PostPosted: Tue Oct 13, 2009 2:02 am 
Offline
Some call me a god
User avatar

Joined: Fri Aug 15, 2008 2:19 am
Posts: 1629
Location: Tonawanda, NY
It's starting to get cold here in Western NY, so I've decided it's time to push forward with my AWD swap. This isn't my first AWD swap on a Mitsubishi, but it's definitely not the same as my last.
Image

This is a work in progress, and it's not going to be done in a couple days or weeks, but I hope to have it AWD by spring 2010. I'll update the post as I make progress. All the thumbnails are clickable links to full size images.

Chapter one The Beginning:
Technically I started last December when I built a W5M33 from my 91 Talon Tsi parts car. That was pretty straightforward; I had to modify the mount on the top of the transmission to fit the stepped bolt patern used on the AWD unit. I also used the shift linkages from my KM206 so the shifter would work right. Besides those minor annoyances, the transmission was a direct swap with the use of a DSM intermediate axle, and a Turbo Colt driver side axle. You can use the long (CSM) driver side axle in the transmission but it wouldn't clear the transfer case.
Image Image Image
...........Donor car.................W5M33.................The CSM axle is shorter.

Chapter two The Crossmember:
I ran the car all summer '09 with the W5M33 in FWD mode. I used a spool for the center differential, and a posi insert in the front. Thanks to this site and it's members, I was able to aquire the holy grail of swap parts, a front crossmember and mounts from an AWD Cyborg Colt.
Image
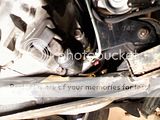
This thing turned out to be a bit of a pain, but still worth every bit of the $250 purchase price in my opinon. The first thing I noticed was that the tall mount in the back occupies the same space as the front sway bar on our (or at least my) left hand drive cars. In picture two (below), you can see the other PITA; on the left, the 1.6T FWD bracket mounts flat to the back of the block, and on the right the Cyborg mount is stepped. :wtf: I cut the stepped part off and had plenty of material left to weld a new chunk of 3/8" steel in it's place. Since the Cyborg bracket bolts to the engine and the transmission, I bolted it in place and tacked the two parts while in place.
Image Image Image Image
Image

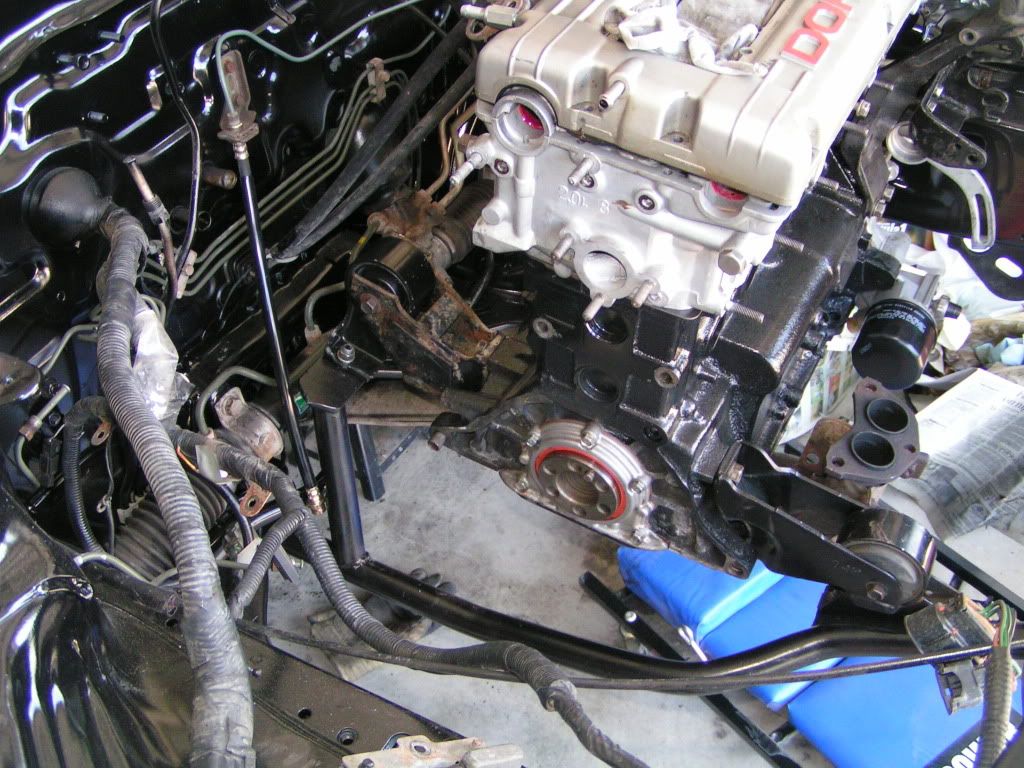
The tall mount in the rear is the difficult one to modify, because not only does the sway bar cut right through the middle of it, it also moves up and down in the middle of it. I figured out what kind of clearance I would need, and cut an arc out of the mount to accomodate the sway bar. There wasn't much left of the mount with the whole middle gone, so I beefed it up by welding in a 3/8" thick plate to cover the hole I made in it.
Image Image Image Image Image
Image

The third issue with fitment required me to install a 98-99 GSX slave cylinder. The stock one has the banjo bolt in the bottom, and that doesn't clear the crossmember. Easy swap for that part.
Image Image
That step was reasonably painless. It only took a few hours or about a day to remove the straight crossmember, make the needed modifications, and install the AWD crossmember. I took the car out afterward and test drove it with the new crossmember in it, and it worked flawlessly. No noises, no adverse affects. The car spun the front tires in third gear going 50 mph, and when I got back to the shop I did a nice second gear burnout. Nothing made noise or broke, and I now have a place to mount a transfer case, so I'm calling it a success! :supz:
Image Image ImageImage Image Image
Image
That's it for now; I need to move the exhaust over about an inch or two to clear the transfer case, but that all needs to be reworked anyway. Other than that, there's the driveshaft, the fuel tank, and the rear AWD subframe. Stay tuned for the next installment. :yawinkle:


Last edited by Coltsfan on Sat Mar 20, 2010 7:17 pm, edited 2 times in total.

Top
   
PostPosted: Tue Oct 13, 2009 11:43 am 
Offline
The happy administrator
User avatar

Joined: Tue Apr 20, 2004 3:20 pm
Posts: 5583
Location: Wisconsin
Excellent writeup! So we can say for sure that the cyborg crossmember won't work with our swaybars? Do you have a turbo sway bar or a 1.5 sway bar?

_________________
Had a:
1991 Eagle Summit ES Hatchback - 4g15 12v 5spd
1991 Dodge Colt -4g15 12v 4spd
Have a:
1978 Oldsmobile Cutlass - 468BBO TH350
Round 3:
1990 Dodge Colt-4G63T 5spd


Top
   
PostPosted: Tue Oct 13, 2009 10:00 pm 
Offline
CSM Expert
User avatar

Joined: Sat Nov 03, 2001 7:00 pm
Posts: 2187
I bought the cross member for two main reasons

1.) Protect the transmission
2.) Eliminate my front left to right cross bar
3.) Strengthen the front/rear (currently both my front and rear mounts are left/right, nothing going from the front of the car to the back)
4.) To say "I got a JDM AWD OEM Crossmember woo woo"

Hopefully the rear mount will clear the 1.5L sway bar otherwise I will just use my current rear mount or modify this one.


Top
   
PostPosted: Wed Oct 14, 2009 12:16 am 
Offline
Some call me a god
User avatar

Joined: Fri Aug 15, 2008 2:19 am
Posts: 1629
Location: Tonawanda, NY
Quote:
Excellent writeup! So we can say for sure that the cyborg crossmember won't work with our swaybars? Do you have a turbo sway bar or a 1.5 sway bar?
I have a 20mm swaybar from a 1989 Eagle Summit 1.6 N/A sedan with a hydro five speed and four wheel disk brakes. As far as I can tell, it's the same swaybar that's in a turbo model. I've asked a few people with original turbo cars to show their swaybars, but so far I've had no results.

I found a picture of one of Mirage91's cars where you can see the base model sway bar would present the same problem:
http://viewmorepics.myspace.com/index.c ... D=55031444


Top
   
PostPosted: Wed Oct 14, 2009 12:56 am 
Offline
Some call me a god

Joined: Wed Oct 04, 2006 3:03 pm
Posts: 1134
Location: Calgary, AB, Canada
Nice write up. I am awaiting for the rear subframe install. Not to steal anything away from your project but here are some picture of the unit I have that was graciously made for me by another member.

In this picture you can see the wrong front metal mount I used. This cross member is made for and AWD front metal mount. I lost the front pad for jacking up the car :(
http://i132.photobucket.com/albums/q4/j ... CT0102.jpg

And the sway bar clearance as you say is an issue. I used an elantra sway bar. (sorry iphone pic, you can see where its notched out)
http://i132.photobucket.com/albums/q4/j ... G_0167.jpg


I used an 1g 3" downpipe it seems to leave enough room for the transfer case and drive shaft.

_________________
05 wrx wagon
99 Benz ML 320
91 eagle summit swapped - 6/4 bolt combo
94 Audi s4 - sold
88 Eagle Vista Turbo LX sedan, RIP


Top
   
PostPosted: Wed Oct 14, 2009 8:41 am 
Offline
Some call me a god
User avatar

Joined: Fri Aug 15, 2008 2:19 am
Posts: 1629
Location: Tonawanda, NY
Nice j2dapo! I see the Elantra bar has the same clearance issue as mine; is that a 20mm bar too? I'm not sure what you mean about the front metal bracket being wrong. The one I had on my 2.0 FWD said 742 on it, and the one evo-mirage sent me from NZ says 742 on it as well. I assume the 742 one is the right part.


Top
   
PostPosted: Wed Oct 14, 2009 11:36 am 
Offline
Some call me a god

Joined: Wed Oct 04, 2006 3:03 pm
Posts: 1134
Location: Calgary, AB, Canada
My crossmember is made to work with an awd front mount not the stock CSM one, (742). That is all. The elantra sway bar is 20 mm. Pretty sure I measured it.

_________________
05 wrx wagon
99 Benz ML 320
91 eagle summit swapped - 6/4 bolt combo
94 Audi s4 - sold
88 Eagle Vista Turbo LX sedan, RIP


Top
   
PostPosted: Sun Oct 25, 2009 10:41 pm 
Offline
Some call me a god
User avatar

Joined: Fri Aug 15, 2008 2:19 am
Posts: 1629
Location: Tonawanda, NY
Chapter three "Oh God Man! What have I done?":

I took the exhaust out of the car today, and fitted the transfer case to the transmission. I need some bolts for that if anyone has the three long ones laying around for a 1g transfer case. I stuck a piece of aluminum pipe into the back of the transfer case to help mock up driveshaft alignment.

Then I ripped out my gas tank, and my rear suspension. The bolts were stuck in the radius arm bushings, so I went sick on the mounting tabs with an air chisel :vom: . Now I guess there's no turning back. I'll need to step up the pace until I can roll this thing off the lift again because I hate to tie up a good lift.

There's more rust under there than I wanted to see, so I think I need to start by media blasting the bottom, then I can begin cutting the spare tire well out. On second thought, I'll weld in the replacement floorpan, then media blast. I wonder if the trunk floor and gas tank from the DSM will work.

I'm feeling a little nervous about hacking up such a fun car. I kinda feel like I just ran over my dog or something. :o

Image

I hope I can use this from the DSM too, Image and maybe even a foot of the rear tunnel.


Top
   
PostPosted: Tue Oct 27, 2009 12:28 am 
Offline
Some call me a god
User avatar

Joined: Fri Aug 15, 2008 2:19 am
Posts: 1629
Location: Tonawanda, NY
I didn't get to work on it much today, I got one of the subframe mounting pads out of the DSM, and cleaned up.

Image
All these thumbnails can be clicked on for a better view.
The fit isn't what I was hoping, but it gives me something to work with. I should have something relatively factory looking when I get through with it.


Top
   
PostPosted: Wed Oct 28, 2009 3:07 am 
Offline
Some call me a god
User avatar

Joined: Fri Aug 15, 2008 2:19 am
Posts: 1629
Location: Tonawanda, NY
I figured out the plane that follows my driveshaft centerline today.
Image

Then I decided to cut into my framerails so I could mount the subframe up higher into the vehicle. I almost have mount one lined up.
Image
Image
Image


Top
   
PostPosted: Wed Oct 28, 2009 11:45 pm 
Offline
Some call me a god
User avatar

Joined: Fri Aug 15, 2008 2:19 am
Posts: 1629
Location: Tonawanda, NY
I measured ten million times, for days and days, then finally started welding my first piece in. I mocked up my second piece from the cover of the phone book, then some heavier cardboard before I make the final piece from 16 gauge sheet metal.
ImageImageImage<<<< Clickable thumbnails<<<
Image
I swear I didn't set that up. I looked at the floor under the car, and it said "FREE ALIGNMENT CHECK"! Awesome I'm going to take them up on that.


Top
   
PostPosted: Thu Oct 29, 2009 9:50 am 
Offline
Some call me a god

Joined: Sun Nov 03, 2002 8:01 pm
Posts: 1108
Location: Sask. Canada
Nice job on it so far. I really like it when someone does it a bit differently with their own ideas. I think it took me about 4 hours or so messing around with jacks and a tape measure to get the rear diff setup under the car. Passed an alignment too :D

_________________
- Works in da bush


Top
   
PostPosted: Sun Nov 01, 2009 3:32 am 
Offline
Some call me a god
User avatar

Joined: Fri Aug 15, 2008 2:19 am
Posts: 1629
Location: Tonawanda, NY
I enclosed the back of the floor in the other day with some rope, duct tape, and a 16'x20' tarp. Then I shot a hundred pound bag of black beauty at it about three times over. The tarp not only contained the mess, but it also made it really easy to recycle the media. Here's a shot of it all blasted, and sprayed with self etching primer:
Image

Then on Friday, I trimmed te extra scraps off:
Image

On Haloween I got the front mounting pads in place along with a cross brace for chassis stiffening:
Image
Image
Image
Image

Next step is to cut the spare tire tub out ;-)


Top
   
PostPosted: Tue Nov 03, 2009 1:44 pm 
Offline
Some call me a god
User avatar

Joined: Fri Aug 15, 2008 2:19 am
Posts: 1629
Location: Tonawanda, NY
I've cut the spare tire well out of my car, and meticulously removed the trunk floor from the Talon for transplantation. I also pulled the cross beam that the mustache bar bolts to the bottom of. I trimmed the cross beam, bolted it back onto the mustache, and test fitted the DSM rear suspension to the Colt for the first time.

I think it looks good; the only clearance issue is that I need to pound two little dimples into the floor under the middle of the back seat. The subframe touches the slightest little bit.

Next step is to remove the cross brace and media blast it before welding it into place. Then I can move onto everything else. Anyone in or around NY interested in an unpaid internship position?
ImageImageImage
Image
Image
Image
Image
Image
Image
Image
Image
Image
Image


Top
   
PostPosted: Tue Nov 10, 2009 12:39 am 
Offline
CSM Junkie
User avatar

Joined: Wed Feb 28, 2007 10:20 pm
Posts: 635
Location: New Bedford, Mass.
SOB, that came out good, if I know that I could have done it that way I would have cut everything out of my donor car, shit you suck,lol. BTW Awesome work, it looks like it was made from the factory that way,lol. Too bad that you don't live near me, because I would have sent my elantra to you, :wink:


Top
   
Display posts from previous:  Sort by  
Post new topic  Reply to topic  [ 87 posts ]  Go to page 1 2 3 4 5 6 Next

All times are UTC-05:00


Who is online

Users browsing this forum: No registered users and 3 guests


You cannot post new topics in this forum
You cannot reply to topics in this forum
You cannot edit your posts in this forum
You cannot delete your posts in this forum
You cannot post attachments in this forum

Jump to:  
cron
Powered by phpBB® Forum Software © phpBB Limited